- I recently updated my Raspberry Pi post with details about the latest Raspbian system
- Skibidi was a thing
- I watched quite a few SpaceX space ship launches live on YouTube
- In Helsinki, Finland the Redi shopping centre was finished. The general public found its layout highly confusing and the entrepreneurs found their businesses didn't attract enough customers. I visited it once.
- In February, Civilization VI: Rise and Fall was released
- I got some Ruuvi sensors and started playing with them
- I also got a Bluetooth-enabled bike light(!?), a Magicshine MS-606C 1600 (MJ902B)
- It seems that I posted over 50 photos on Instagram
- I read several good books by Malcolm Gladwell
- I enjoyed playing Heat Signature and Keep Talking and Nobody Explodes
- More than 12 million items (source) were created in Wikidata. I also created some Wikidata queries.
maanantai 31. joulukuuta 2018
2018 Year in Review; Happy New Year 2019!
Just to get a post in 2018 too, here's a random list of big or small things that happened this year, for me or just generally in the world, in no particular order:
sunnuntai 8. tammikuuta 2017
Raspberry Pi 3 no monitor & no keyboard: setup with Windows – Tutorial
 |
| Raspberry Pi 3 Model B |
- Download Raspbian Stretch Lite (pro tip: the Torrent file loads faster)
- Download Etcher
- Run Etcher to install the Raspbian Stretch Lite on your microSD card
Etcher may unmount the card after it's done: remount it, then add a new file into it, called "ssh". No extension, no contents in the file. This enables the SSH daemon on the Raspbian.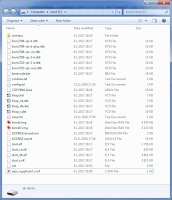
Contents of the microSD card - Optional: If you want to use your Raspberry with a WIFI connection instead of an Ethernet cable, add another new file called "wpa_supplicant.conf". In this file add the following:
network={
ssid="NAME OF YOUR WIFI"
psk="PASSWORD OF YOUR WIFI"
} - Insert the microSD card into your Raspberry Pi, then start it by connecting the power cord. Make sure the Ethernet cable is connected too – or that you completed the optional step 5 above. The system will be ready in about 15 seconds.
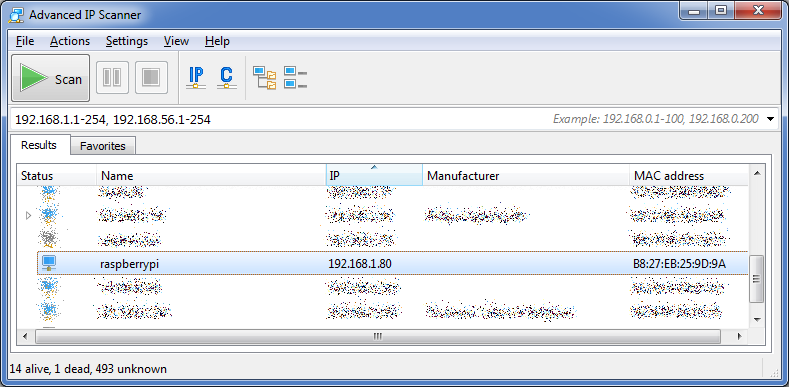
Using either your router's admin view or the Advanced IP Scanner program find the IP address of your Raspberry.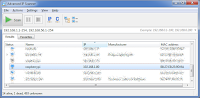
Advanced IP Scanner - Use Putty to connect to your Raspberry
Username " pi ", password "raspberry".- You are now logged in. Now update your system: first do "sudo apt-get update" and then "sudo apt-get dist-upgrade".

 |
| Logged in |
PS. If you don't have a case for your Raspberry, why not find a 3D printer and print one? Thingiverse has for example this one that also fits perfectly for a Raspberry Pi 3 model B.
lauantai 16. tammikuuta 2016
Hexcells, Hexcells Plus & Hexcells Infinite
 |
| Level 6 from Hexcells Plus, in its initial state. |
It took me less than two hours to perfect the original Hexcells and I figured I could've played some more, so I bought Hexcells Plus and Hexcells Infinite too. All of the games have initial tutorial levels to teach the mechanics, but the difficulty level in Hexcells Plus goes up way quicker than in Hexcells -- there are few really easy levels. The more difficult levels can even take up to 30 minutes or so, which started to feel like too much, especially given that you cannot save the game in the middle of a level! Also, it does feel irritating if you make a mistake towards the end of a level after having spent 20 minutes on it, especially if you're after the Perfectionist achievement without cheating.
 |
| Level 29 from Hexcells, almost solved. |
Playing all the three games is starting to feel a bit laborious, but the games are strangely addicting and you often feel like playing one more level even though the last one already took too much time. I can warmly recommend any of these games to any puzzle-lover out there. I liked the original Hexcells the most, as it offered a short Flow-state of puzzle-solving, whereas the other games make you put much more effort into them. Hexcells is also priced the same as Hexcells Plus, Hexcells Infinite being a bit more expensive. All the games are sold in a bundle too, which you might find at a nice discount in some Steam sale.
sunnuntai 11. toukokuuta 2014
Peter Watts: Blindsight

Blindsight, on the other hand, is a 2006 novel by Peter Watts. The events of the story take place in the 2080s, when a spaceship called Theseus is sent to investigate an alien object somewhere far beyond the Kuiper belt. Technology has advanced greatly since our days. 3D printers, called fabricators, can print just about anything, including computers and robots. Medical treatment can also cure almost anything short of a major brain damage, including severe radiation poisonings. People get their brain rewired for attitude adjustments and DNA augmentation isn't uncommon either. The minds of deceased people are copied into a virtual world called Heaven, and the living can visit them there.
The story follows the events in and around Theseus. The crew consists of an AI called the Captain and five people: Siri Keeton, Susan James, major Amanda Bates, Isaac Szpindel and Jukka Sarasti. Keeton is a synthesist, trained (with the help of some brain augmentations) to understand complex systems and to explain them to others. He is also the narrator of the story and is included in the crew to observe everything that happens and report back to Earth regularly. Susan James is the "mother" of the Gang of Four, the other minds living in her brain: regularly any of the Gang of Four may take control of their common body, and together they form a highly functional unit specialized in linguistics, to speak with the aliens. Amanda Bates is the soldier in case things get bad, and Isaac Szpindel is the biologist, to study the aliens. Finally, Jukka Sarasti is the commander in charge of the operation. He is also a vampire, brought back from extinction by the science of paleogenetics.
If at this point you flinched, don't. Vampires aren't some magical creatures, but the author has actually devised a plausible evolutionary history for Homo sapiens vampiris. It is, for example, noted that vampires are sociopaths: "Vampires had to be sociopaths. They're too much like their own prey—a lot of taxonomists don't even consider them a subspecies, you know that? [...] If the only thing you can eat is your own kind, empathy is gonna be the first thing that goes. Psychopathy's no disorder in those shoes, eh? Just a survival strategy." The reason why there's a vampire commanding the crew is that vampires have superior pattern-matching and analytic skills compared to humans. It's basically hinted that in a traditional IQ test a vampire could score four digit numbers, whereas the average human IQ is 100. That makes sense, since if you are going to hunt something as clever as man, you'd better be smarter than your prey. Additionally, vampires are solitary hunters: very territorial and never team up.
In many works of fiction long distances in space are covered in some kind of cryogenic sleep. Watts has cleverly combined this with vampires, as the crew's DNA has been augmented with some vampire DNA, allowing them to be "dead" for a long period of time and then be woken up again.
Regarding Susan James, it's important to note that the Gang of Four (her and Michelle, Sascha and Cruncher, who is the only male in the gang) aren't Susan's alter egos or anything like that, but indeed completely other people. While Susan's brain has become "multi-core" with the help of a surgery, it is noted that a simple, strong enough stress could also split the brain the same way. The story makes a clever remark about the multi-core people of the past: "People were fucking barbarians about multicores back then—called it a disorder, treated it like some kind of disease. And their idea of a cure was to keep one of the cores and murder all the others. Not that they called it murder, of course.".
A few times during the book there's a nice recurring narrational feature, where a section would start with "Imagine you are [someone or something]" and the story would progress for a while describing what you usually do and how you usually think, and reflect that to the events at hand. That's a nice break from the other narration and I haven't seen it used in other books. Just when you might think the trick is getting old, it disappears for a couple of hundred pages, just to resurface to wrap the entire story up. So the narration (as well as the vocabulary) is clearly way, way above that of, say, Dan Brown's works.
On the cover of the book there's a quote from a British author Charles Stross: "Blindsight is a tour de force, redefining the First Contact story for good.". That should already give it away that aliens are indeed encountered when Theseus reaches its target. But what do you do when you don't even know if the aliens are way smarter than you, or if they are as stupid as dandelions? The book explores interesting concepts such as the Chinese room and the relationship between sentience and intelligence. The author has clearly seen a lot of trouble making everything so different from other stories, yet plausible, and also manages to make you think.
I recommend the book for anyone interested in hard-SF. I'd also recommend the novel for anyone who's not interested in science fiction, as this might be a good starting point with the more realistic setup than, say, Star Trek. The author has published the entire book on his web site at Rifters.com in PDF and HTML formats as well as in some e-book formats.

sunnuntai 12. tammikuuta 2014
The best Firefox plugins for web developers
 |
| Tamper Data |
 |
| JSONView |
 |
| XPath Checker |
- Advanced Cookie Manager: Inspect and easily edit and/or remove any cookies there are
- JSONView: Makes JSON documents easily inspectable with syntax highlighting and collapsible structure
- Live HTTP Headers: Makes it trivial to inspect the HTTP headers of all requests and their responses
- Tamper Data: Modify HTTP and HTTPS post parameters and headers
- XPath Checker: View and test XPath expressions on the current page
Finally, there's a whole array of plugins for Firebug and there's something for everyone, so I'm not going to list any individual plugins from there. Just take a look and pick whatever you might like. :)
lauantai 14. syyskuuta 2013
Humble Indie Bundle 9
Name your price for four excellent indie games -- six, if you pay above the average, which is currently mere USD 4.59! The above-average-price games are Fez and FTL: Faster Than Light which have both received highly favorable reviews. Within the four games that you can get for any price there's for example such a gem as Mark of the Ninja. All the games work for Windows, Linux and Mac. You'll get Steam keys and you also get to download them, free of any DRM technologies that would hinder the gaming experience.
maanantai 1. huhtikuuta 2013
iPad games
Aside from all the Rovio's Angry Birds and Bad Piggies games, there are many other great games for iPad. I present three of them here, in no particular order.
 Need for Speed: Most Wanted is a beautiful and well implemented racing game. There are several different tracks with different types of races. More tracks are unlocked when you do well, and more cars become available for purchase with the money you earn from winning the races. There are many types of cars and not all races are open to, say, sports cars, but you need to drive, for example, a Hummer every once in a while as well. Aside from their looks the cars have a few different attributes that make them different: speed, acceleration and handling, and there's also implicitly the weight. These attributes can be modified per race by adding various modifications to the car. These mods include engine tweaks, lightweight chassis and reinflating tyres (Yes, reinflating tyres are needed -- the races in the game are "illegal", so there are police cars that may try to stop you using spike strips). You control the car by steering your entire iPad (or iPhone), which is quite a nice and intuitive way of driving. You can also touch the right side of the screen to drift. NFS:MW does not support the Apple Game Center but it has its own in-game social system called Origin, for which you might actually already have an account if you have played any other Electronic Arts games recently, even on PC.

 Fieldrunners 2 is a tower defense game where almost endless hordes of enemies try to cross the playing area on which you must build a maze for them using various lethal obstacles, including machine gun towers, flamethrower towers and radiation towers. The game is pretty and humoristic, has many levels of a few different types, and it has quite a few different types of towers as well. At the beginning only some quite basic towers are available, but more can be purchased with the in-game gold. Compared to Plants and Zombies I prefer Fieldrunners 2 by far. Some maps of Fieldrunners 2 even contain director's commentary on how the map came to be. There are also many different enemies with different traits: some are very fast, some fly over your defense towers, some are immune to radiation. The Heroic difficulty level also basically requires you to use items that you can drop on the field for some brief additional effect, such as freezing, poisoning or exploding the enemies. Fieldrunners 2 integrates nicely with the Apple Game Center, allowing you to compare you scores with those of your friends.
SpaceChem is an excellent puzzle game unlike any other I have ever played. In the game your task is to build reactors to transform molecules and atoms to other molecules. You do this by creating "tracks" for molecule transporters (called "waldos") and by adding instructions to those tracks: input atom, grab an atom, drop the atom, rotate the molecule, etc. While this all might sound or look incomprehensible at first, the game actually has a good tutorial that slowly introduces you to all the concepts little by little. On some levels (so called research assignments) you must only build one reactor, whereas in others (production assignments) you actually design several reactors and how they connect to each other. The game is also available for Windows, Linux and Android, which may be one reason why it unfortunately does not integrate with the Apple Game Center. However, this game as well has a social component: on each level you can see statistics about all other plays of the level by everyone else. The statistics include the number of reactors used, number of cycles used and number of instructions used, so you can try to optimize your solution according to different attributes, if you want to. There are also in-game achievements to earn by, say, completing a certain level in a certain amount of cycles (in-game "ticks of time"). SpaceChem has a few dozen levels built in and more can be downloaded from the Research Net, so it should provide hours of fun.
That's it for this time, but finally, a tip: you can use the AppShopper.com site to watch for price drops and new apps. It also shows the price history of all the apps in the App Store, and you can browse apps by popularity and category.
Need for Speed: Most Wanted

Fieldrunners 2

 Fieldrunners 2 is a tower defense game where almost endless hordes of enemies try to cross the playing area on which you must build a maze for them using various lethal obstacles, including machine gun towers, flamethrower towers and radiation towers. The game is pretty and humoristic, has many levels of a few different types, and it has quite a few different types of towers as well. At the beginning only some quite basic towers are available, but more can be purchased with the in-game gold. Compared to Plants and Zombies I prefer Fieldrunners 2 by far. Some maps of Fieldrunners 2 even contain director's commentary on how the map came to be. There are also many different enemies with different traits: some are very fast, some fly over your defense towers, some are immune to radiation. The Heroic difficulty level also basically requires you to use items that you can drop on the field for some brief additional effect, such as freezing, poisoning or exploding the enemies. Fieldrunners 2 integrates nicely with the Apple Game Center, allowing you to compare you scores with those of your friends.
SpaceChem
 |
| Reactor splitting Nitrogen and Oxygen molecules |
 |
| A production assignment in action |
That's it for this time, but finally, a tip: you can use the AppShopper.com site to watch for price drops and new apps. It also shows the price history of all the apps in the App Store, and you can browse apps by popularity and category.
Tilaa:
Blogitekstit (Atom)