 |
| Raspberry Pi 3 Model B |
In this post I'm succinctly going to explain how to setup a Raspberry Pi computer that does not have a monitor or a keyboard (a "headless" setup), using a Windows PC. I'm using a
Raspberry Pi 3 Model B. The microSD slot is under the circuit board, at the other end where the USB and Ethernet connectors aren't. At the time of writing this post the latest version of the Raspbian
Jessie Stretch Lite operating system is the version that was released on
2016-11-25. (
Update on December 2018: The latest version is nowadays called Stretch, not Jessie, and it was released on 2018-11-13!)
- Download Raspbian Stretch Lite (pro tip: the Torrent file loads faster)
- Download Etcher
- Run Etcher to install the Raspbian Stretch Lite on your microSD card
 |
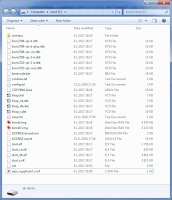
| Contents of the microSD card |
Etcher may unmount the card after it's done: remount it, then add a new file into it, called "ssh". No extension, no contents in the file. This enables the SSH daemon on the Raspbian. - Optional: If you want to use your Raspberry with a WIFI connection instead of an Ethernet cable, add another new file called "wpa_supplicant.conf". In this file add the following:
network={
ssid="NAME OF YOUR WIFI"
psk="PASSWORD OF YOUR WIFI"
}
- Insert the microSD card into your Raspberry Pi, then start it by connecting the power cord. Make sure the Ethernet cable is connected too – or that you completed the optional step 5 above. The system will be ready in about 15 seconds.
 |
| Advanced IP Scanner |
Using either your router's admin view or the Advanced IP Scanner program find the IP address of your Raspberry.
- Use Putty to connect to your Raspberry
- Username "pi", password "raspberry".
- You are now logged in. Now update your system: first do "sudo apt-get update" and then "sudo apt-get dist-upgrade".
 |
| Logged in |
Congratulations, your Raspberry Pi is now ready for use!
PS. If you don't have a case for your Raspberry, why not find a 3D printer and print one? Thingiverse has for example
this one that also fits perfectly for a Raspberry Pi 3 model B.


